Battery switch on travel trailer function is crucial for managing your RV’s power. Understanding how these switches work—whether they’re single, dual, or rotary—is key to preventing dead batteries and protecting your valuable electronics. This guide breaks down everything you need to know about your travel trailer’s battery switch, from its basic function to advanced troubleshooting and maintenance.
We’ll explore different switch types, their pros and cons, and provide step-by-step instructions for safe operation in various situations, like boondocking or campground use. We’ll also cover common problems and how to fix them, plus essential safety tips for working with your RV’s electrical system. Get ready to become a battery switch expert!
Types of Battery Switches in Travel Trailers
Choosing the right battery switch for your travel trailer is crucial for managing your power sources efficiently and safely. Different switches offer varying levels of control and complexity, each with its own set of advantages and disadvantages. Understanding these differences will help you select the best option for your needs.
Single Battery Switches
Single battery switches are the simplest type, designed to connect or disconnect a single battery from the trailer’s electrical system. They’re typically found in smaller trailers with only one battery. These switches usually offer an “on” and “off” position, providing a basic level of control.
Dual Battery Switches
Dual battery switches, as the name suggests, control two batteries. This setup is common in larger travel trailers or those needing more power. They allow you to isolate either battery, use both simultaneously, or completely disconnect both from the trailer’s electrical system. This is useful for preventing accidental drain of one battery while the other is charging.
Rotary Battery Switches, Battery switch on travel trailer function
Rotary battery switches are more advanced and provide more control than simple on/off switches. These switches often feature multiple positions, allowing you to select which battery (or combination of batteries) is connected to the trailer’s system, as well as a completely off position. Some even incorporate a “both” position, connecting both batteries in parallel for increased amperage.
Comparison of Battery Switch Types
The table below summarizes the features, advantages, and disadvantages of the different battery switch types discussed.
| Switch Type | Number of Batteries Controlled | Features | Pros | Cons |
|---|---|---|---|---|
| Single Battery Switch | 1 | Simple on/off control | Simple, inexpensive, easy to install | Limited control, only suitable for single-battery systems |
| Dual Battery Switch | 2 | Separate control of each battery, ability to combine both | Increased power capacity, better battery management | More complex than single switches |
| Rotary Battery Switch | 2 or more (depending on the switch) | Multiple positions for various battery configurations, including “both” and “off” positions | Maximum control over battery usage, prevents accidental drain | More expensive, requires more understanding to operate |
Using the Battery Switch
Safe and correct operation of your travel trailer’s battery switch is crucial for preventing electrical issues and ensuring the longevity of your batteries. Understanding the different settings and procedures will help you avoid costly mistakes and maximize your enjoyment of off-grid adventures. This section provides a step-by-step guide to safely operate your battery switch in various situations.
Switching Between Batteries
Properly switching between your travel trailer’s batteries is essential for managing power and extending battery life. If your setup includes multiple batteries (like a house battery and a starting battery), you’ll need to understand how your switch operates to select which battery or combination of batteries provides power to your appliances. Most switches offer positions for “both,” “house,” “starting,” and “off.”
- Identify your switch positions: Before making any changes, familiarize yourself with the markings on your battery switch. Each position will correspond to a specific power configuration.
- Turn off all appliances: Before switching between battery banks, always ensure all appliances and electronics in your travel trailer are turned off. This prevents potential surges or short circuits.
- Select the desired position: Carefully move the switch to the desired position (“both,” “house,” “starting,” or “off”). The switch will typically have clearly marked positions.
- Verify power: After switching, check that power is flowing to the intended circuits. For example, if you’ve switched to the “house” battery, test your interior lights or other house appliances. If you’ve switched to the “starting” battery, try starting your vehicle’s engine.
Connecting to Shore Power
Connecting to shore power (hooking up to campground electricity) changes your power source. It’s important to manage the transition safely to avoid damaging your batteries or electrical system.
- Connect to shore power: Plug your RV’s shore power cord into the campground’s power pedestal and then into your RV’s power inlet.
- Turn on shore power: Once connected, turn on the breaker at the power pedestal. Your RV’s internal power system will now be supplied by shore power.
- Battery switch position: You can leave the battery switch in any position (excluding “off”) if you want to continue using your house batteries to power some appliances, or you can switch to the “off” position to prevent battery discharge. Many RVers prefer to leave the switch in the “off” position while connected to shore power to conserve battery life and prevent overcharging.
Disconnecting Power Completely
Completely disconnecting power is vital for long-term storage or when leaving your travel trailer unattended for extended periods.
- Disconnect from shore power: Unplug your RV’s shore power cord from both the campground’s pedestal and your RV’s power inlet.
- Turn the battery switch to “off”: This will completely disconnect the batteries from the RV’s electrical system, preventing any accidental discharge.
Boondocking Procedures
Boondocking (off-grid camping) requires careful battery management.
When boondocking, you rely solely on your batteries. Efficient power usage and monitoring are crucial. Begin by ensuring your batteries are fully charged before leaving for your boondocking trip. The battery switch will allow you to choose between using both batteries, just the house battery, or just the starting battery, depending on your needs and the remaining charge.
Regularly monitor your battery levels using a voltmeter or battery monitor to prevent depletion. Consider prioritizing essential appliances and minimizing energy consumption to maximize your off-grid stay.
Campground Use Procedures
Campground use typically involves connecting to shore power.
While connected to shore power at a campground, you generally won’t need to use your batteries to power the majority of your appliances. However, you may want to leave your battery switch in the “both” or “house” position to allow your batteries to charge from the shore power. Alternatively, switching to “off” will completely disconnect your batteries and prevent any potential issues with the charging system.
Keeping a battery monitor handy will allow you to track the charging process.
Battery Switch Maintenance and Upkeep
Keeping your travel trailer’s battery switch in top condition is crucial for reliable power and preventing costly repairs down the road. Regular maintenance ensures your batteries are properly connected and protected, preventing corrosion and ensuring efficient power transfer. Neglecting this can lead to poor battery performance, system failures, and even potential fire hazards.Regular maintenance of your battery switch is straightforward and will significantly extend its lifespan.
A simple inspection and cleaning routine can prevent problems before they arise, saving you time, money, and frustration on the road. Think of it as preventative maintenance – a small investment of time that yields significant long-term benefits.
So, you’re an audiophile who loves to travel? Awesome! Check out this guide on setting up your audiophile travel setup for amazing sound on the go. It’s crucial to protect your expensive gear, so don’t forget to get travel insurance; I recommend looking into Aon travel insurance for comprehensive coverage. That way, you can enjoy your tunes and your trip without worrying about unforeseen mishaps.
Battery Switch Maintenance Schedule
A good rule of thumb is to inspect your battery switch at least once every three months, or before each extended trip. More frequent inspections are recommended in harsh environments with high humidity or salt exposure. A yearly deep clean, including disconnecting the batteries, is also advisable. This schedule allows for early detection of any issues and ensures your system is always ready for action.
So, you’re an audiophile who travels? Awesome! Make sure you check out this guide on setting up your audiophile travel setup for amazing sound on the go. It’s crucial to protect your gear, and while you’re planning, don’t forget travel insurance! Getting Aon travel insurance gives you peace of mind knowing your valuable equipment is covered in case of loss or damage.
Happy travels and happy listening!
Inspecting Connections, Cleaning Terminals, and Checking for Corrosion
Regularly inspecting the connections on your battery switch is vital. Look for loose connections, damaged wires, or signs of corrosion. Corrosion can impede electrical flow, leading to poor battery performance and potentially damaging your batteries. Tight connections ensure a secure and efficient electrical pathway, maximizing the lifespan of your battery system. Early detection of corrosion prevents more extensive and costly repairs.
Cleaning and Maintaining the Battery Switch and Connections
Cleaning your battery switch and terminals is a simple process. First, disconnect the negative battery cable from the battery. This is a crucial safety precaution to prevent accidental shorts. Next, use a wire brush or a battery terminal cleaner to remove any corrosion from the terminals and the switch itself. A baking soda and water paste can also effectively neutralize corrosion.
After cleaning, apply a corrosion inhibitor, such as dielectric grease, to the terminals to prevent future corrosion. Finally, reconnect the negative cable, ensuring a tight connection. Remember to always reconnect the negative cable last to avoid accidental shorts and ensure safety.
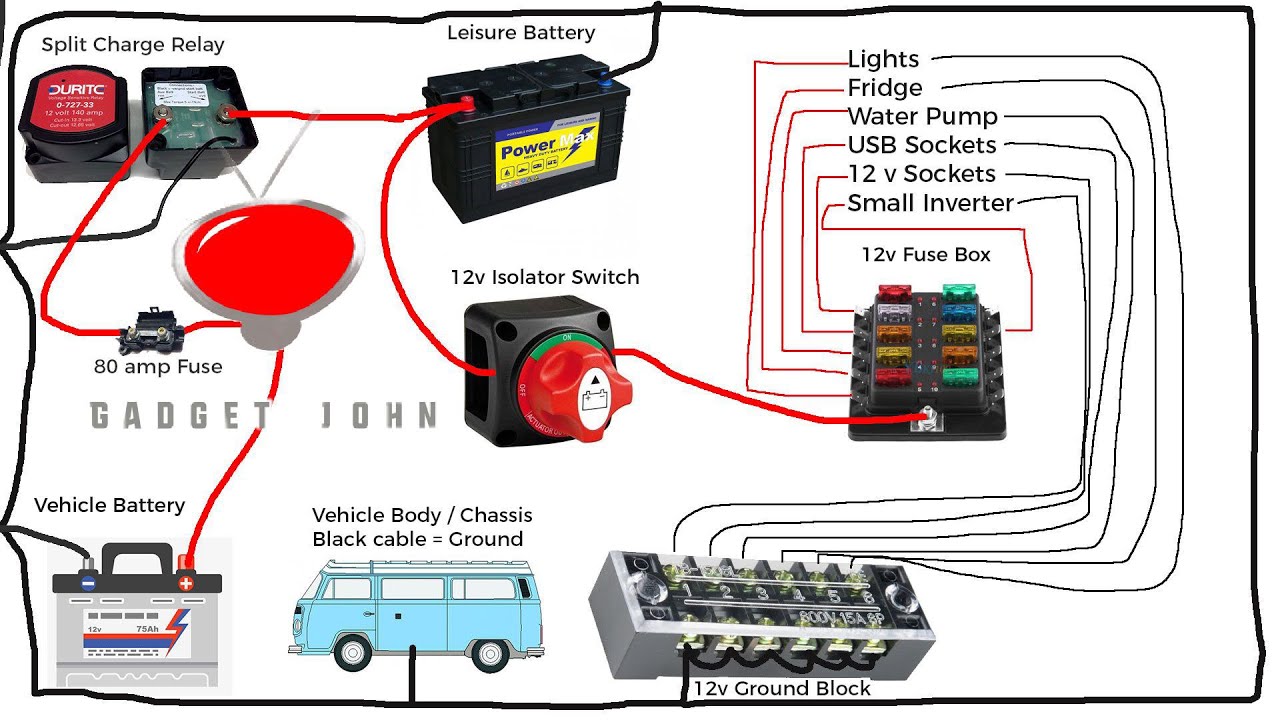
Battery Switch Wiring Diagrams and Schematics: Battery Switch On Travel Trailer Function

Understanding the wiring in your travel trailer’s battery system is crucial for safe and reliable operation. A clear wiring diagram helps you troubleshoot problems and ensures you’re connecting everything correctly. This section will illustrate typical wiring configurations for common battery switch setups. Remember to always disconnect the negative battery terminal before working on any electrical components.
Wiring diagrams use standardized symbols to represent different parts of the electrical system. These symbols allow anyone familiar with electrical schematics to quickly understand how the system is configured. The diagrams below will use simple representations to make the concepts clear.
Typical Travel Trailer Battery Switch Wiring
This example shows a common setup with a single battery switch controlling both the house and chassis batteries, feeding power to the trailer’s loads.
| Component | Symbol | Description |
|---|---|---|
| Battery (House) | ∑ | Provides power for the trailer’s interior systems (lights, appliances, etc.). |
| Battery (Chassis) | ∑ | Powers the trailer’s chassis systems (brakes, lights). Often charged by the tow vehicle. |
| Battery Switch | [ ] | Controls the flow of power from the batteries to the loads. Usually has multiple positions (e.g., OFF, House, Chassis, Both). |
| Fuse | —[ ]— | Protects the wiring from overcurrent. |
| Loads (House) | 〜 | Appliances, lights, and other systems powered by the house battery. |
| Loads (Chassis) | 〜 | Trailer brakes, lights, and other systems powered by the chassis battery. |
In this simplified diagram, the battery switch acts as a central control point. In the “House” position, power flows from the house battery to the house loads. In the “Chassis” position, power flows from the chassis battery to the chassis loads. In the “Both” position, both batteries feed power to their respective loads. The fuse protects the circuits from overloads.
Wiring Configurations for Different Battery Switch Types
Different battery switches offer varying levels of control and complexity. Here are examples of wiring configurations for a few types:
Single Battery Switch (as shown above): This is the most basic setup, ideal for trailers with simpler electrical systems. It’s easy to install and understand but offers limited control. A single switch controls power from both batteries to the trailer loads.
Dual Battery Switch: This configuration uses two separate switches, one for each battery. This allows independent control over each battery, giving you more flexibility. One switch controls the house battery and its loads, and the other switch controls the chassis battery and its loads. Each switch would have its own associated fuse.
Combination Battery Switch (with Isolator): Some systems incorporate a battery isolator in addition to a switch. The isolator automatically prevents battery drain from one battery to the other when the engine is off (typically in the case of a chassis battery). The switch then controls the distribution of power to the trailer loads. This prevents the deep cycle house battery from being drained by the starting battery.
Safety Considerations When Working with Battery Switches
Working with batteries and electrical systems in your travel trailer requires caution. Improper handling can lead to serious injury, including burns, explosions, and electrical shock. Always prioritize safety when working with your battery switch and associated components.Understanding the potential risks involved is crucial for safe operation. Batteries contain corrosive chemicals and generate flammable gases. Electrical components can carry lethal voltages.
Even seemingly minor mistakes can have significant consequences.
Battery Safety Precautions
Before starting any work, disconnect the negative (-) battery cable first. This prevents accidental short circuits and reduces the risk of injury. Always wear appropriate safety gear, including safety glasses to protect your eyes from splashes or sparks, and heavy-duty gloves to protect your hands from corrosive battery acid. Never wear loose clothing or jewelry that could get caught in moving parts or conduct electricity.
Work in a well-ventilated area to avoid inhaling potentially harmful gases produced by the batteries.
Electrical Safety Precautions
When working with the battery switch and its wiring, remember that even seemingly inactive circuits can still hold a charge. Always double-check your work to ensure that the power is completely disconnected before making any adjustments or repairs. Use insulated tools to avoid accidental contact with live wires. If you are unsure about any aspect of the electrical system, consult a qualified electrician.
Improper wiring can lead to short circuits, fires, and severe injury.
Personal Protective Equipment (PPE)
Appropriate personal protective equipment (PPE) is essential for safe battery and electrical work. This includes, at a minimum, safety glasses or a face shield to protect your eyes from acid splashes or sparks. Rubber or insulated gloves are crucial to protect your hands from both electrical shock and corrosive battery acid. Consider wearing a long-sleeved shirt and pants to protect your skin.
For more extensive work, closed-toe shoes are recommended. Never work alone; have someone nearby who can assist in case of an emergency.
Mastering your travel trailer’s battery switch is a game-changer for confident RVing. By understanding its function, performing regular maintenance, and knowing how to troubleshoot issues, you’ll keep your power running smoothly, no matter where your adventures take you. Remember safety first – always disconnect power before working on any electrical components. Happy travels!
Key Questions Answered
What happens if I leave my battery switch on all the time?
Leaving your battery switch on constantly can drain your batteries, especially if you’re not connected to shore power. This can lead to a dead battery and potentially damage sensitive electronics.
How often should I check my battery switch connections?
Inspect your battery switch connections at least once a month for corrosion or loose wires. More frequent checks are recommended if you use your RV frequently or in harsh conditions.
Can I use a battery switch with different types of batteries?
Generally, yes, but it’s best to use a switch designed for the voltage of your batteries (e.g., 12V). Consult your switch’s specifications to ensure compatibility.
My battery switch is making a clicking sound. What’s wrong?
A clicking sound often indicates a problem with the switch itself or a blown fuse. Check the fuse first. If it’s blown, replace it with the correct amperage fuse. If the clicking persists, the switch might need replacement.
